No keyboard or screen available for your Raspberry Pi, but you have a laptop?
There are often times when a HDMI monitor is not available to use with your Raspberry Pi. In those circumstances it can be very useful to remote connect using a nearby network and a laptop (see the Guide to…Remote Connections). However, sometimes there isn’t a network available either!
So how can we make use of a laptop screen and keyboard when there is no network?
As discussed previously (in the Guide to…Remote Connections), there is the option of using a (console) TTL-serial cable, however this only provides rather slow access. The serial connection won’t support X11 (which as we have seen, allows us to run graphical programs too), and you won’t be able use VNC or shared folders if you have them setup.
The answer is a simple network cable!
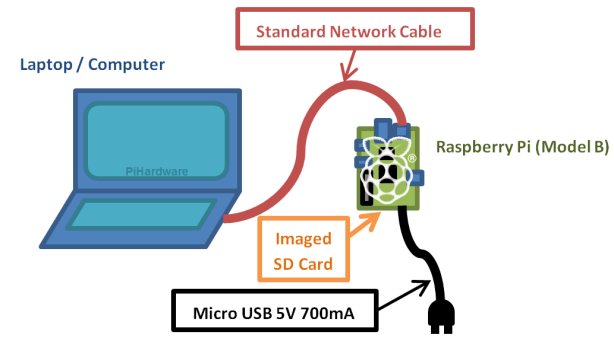
It is advisable to set this up before you need it so you can be sure that it is configured and working correctly. As long as you have an SD-Card reader available, you can switch between the configurations using a laptop (or directly on the Raspberry Pi if you have a screen/keyboard at the time).
Remember if you need the wired network for your computer (i.e. to get internet) then you shall have to make a choice about which one you wish to use (or get an extra network port by adding a USB network dongle). If you use wireless connections, then you can still have both!
Any standard network cable should be suitable (needs to have a male RJ45 connector on each end), most cables available will be fine for our needs.
Note: You can use a normal network cable since the Raspberry Pi LAN chip is smart enough to reconfigure itself for direct network connections (in the past older computers would have needed a special “cross-over” cable).
Step 1 – Find the Laptop’s Network Settings
Before we power up our Raspberry Pi, we can have a look at the network settings of the computer we are planning on connecting to and determine if the address is automatically allocated or fixed.
Windows Instructions:
1. From the Start Menu, run the “Control Panel”.
(Windows 7/Vista) Open “Network and Sharing Center” and click on “Change adapter settings” on the left side.
(Windows XP) Open “Network Connections”
2. Find the item which relates to your Wired network adaptor (by default this is usually called “Local Area Connection”).

Locate the Wired Network Adaptor “Local Area Connection”
3. Right-click on it and open “Properties”.

Network Properties Window, find the TCP/IP Entry
4. Select the item which is called “Internet Protocol (TCP/IP)” or “Internet Protocol Version 4 (TCP/IPv4)” if there are two (the other is Version 6), and open the “Properties”.

Wired Network Adaptor is configured as Automatic
Hopefully, the IP Address will be set to “Obtain an IP address automatically”. If not don’t worry, just take a note of the IP address and Subnet Mask set here (you may find the rest of the information useful to keep, but we won’t need it this time). If you know what you are doing, you can change this setting to automatic, or you can leave it alone (we shouldn’t need to adjust it as long as we know the IP Address).
Sourse : http://pihw.wordpress.com/guides/direct-network-connection/
Sourse : http://pihw.wordpress.com/guides/direct-network-connection/
No comments:
Post a Comment